

If booting freezes or you get stuck forever in the Windows Recovery Environment then you need to manually restore the automatically created backups for bootmgr and winload.exe.
The main goal is to copy "bootmgr~1" to "bootmgr" (at the root of some partition) and "winload~1.exe" to "winload.exe" (in \Windows\system32). After that you will be able to boot.
Once you can boot you need to finish restoring the backups using "Options > Restore Backups" in Windows 7 Boot Updater. You need to repeat this until it says no backups were restored.
You can manually restore the files in many ways including: using a different OS on the same computer (dual-booting), moving the hard drive over into another bootable system, using a Linux Live CD, or using the Windows 7 Recovery Environment. I describe the last method below.
If booting freezes:
- Insert a Windows 7 Install or a Windows 7 Repair disk
If you don't have a DVD drive then you can use a flash drive (see 'Method 2') 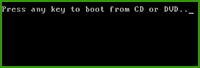 Restart and press any key to boot from the disk when prompted
If you are not prompted then you need to set your computer to boot from the DVD or flash drive- Choose your language and keyboard settings and click "Next"
 or
or 
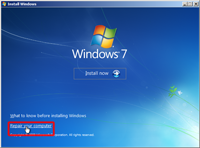 If using an install disk, choose "Repair your computer"
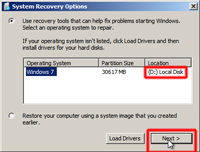 After searching your computer select your Windows installation
Take note of the drive letter since it is probably not what you expect
Click "Next >" and continue with step 6 below
If stuck forever in the Windows Recovery Environment:
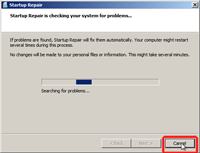 Press "Cancel" right away (while it is still scanning)
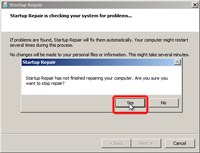 Click "Yes" on the warning that pops up
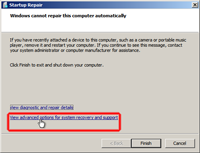 Click "View advanced options for system recovery and support"
- Select your keyboard types and click "Next >"
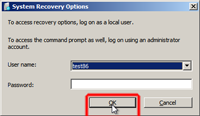 Select an administrator (not "HomeGroupUser$") and enter the password
Click "OK" and continue with step 6 below
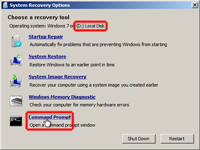 On the recovery tools page take note of the drive letter being used by the recovery system
Click "Command Prompt" (the last option)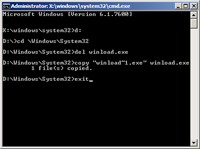 Enter the following commands (you may need to adjust the drive letter): *
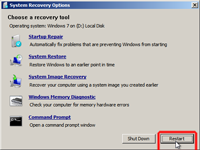 Click "Restart"
Once you get back into Windows you need to delete any additional backups of winload.exe (if you ran Windows 7 Boot Updater more than once) by going to \Windows\system32\ and deleting all the winload~#.exe. After that run Windows 7 Boot Updater and choose "Options > Restore Backups" to restore the other files. Repeat this last part until it says that no files were restored.
* If you still cannot boot your system your bootmgr file may need to be restored as well. This is a little trickier depending on your system. Repeat the above steps, however in place of the commands in step 7 do the following:
Note: Below assumes that the Windows 7 Boot Updater created a backup called "bootmgr~1". However in some cases you many need to use the system backup copy which is located at \Windows\Boot\PCAT\bootmgr in every Windows 7 installation (however this backup does not have any Windows Updates applied to it).
- Run the following commands:
d:
dir /A HS "bootmgr~1"
- If you get "File Not Found" you will have to look for the file, otherwise continue with step 3
- Run the following commands:
diskpart
DISKPART> list volume
All volumes on your computer are listed. The bootmgr is typically on the System or Boot partition (in the "Info" column). If you have a "System Reserved" (says "System Rese" under "Label") partition that is 100-200 MB with no drive letter (under "Ltr") it is probably on that one.
- If the volume has no drive letter (under "Ltr") we need to assign it a drive letter with the following commands. You need to adjust the volume number in the first command see the "Volume ###" column) and the drive letter to something available.
DISKPART> select volume=1DISKPART> assign letter=P
- Run the following commands, changing the drive letter to the one you assigned or looked up:
DISKPART> exit
p:
It doesn't hurt to double check for the "bootmgr~1" file again with the dir command given in step 1.
- Run the following commands:
- Run the following commands:
Once you get back into Windows you need to delete any additional backups of bootmgr (if you ran Windows 7 Boot Updater more than once) by going to where you found bootmgr~1 and deleting all the bootmgr~# [also do this for winload~#.exe]. After that run Windows 7 Boot Updater and choose "Options > Restore Backups" to restore the other files. Repeat this last part until it says that no files were restored.